Why soil prep is non-negotiable
From what I see on job sites every day, Melbourne’s north-eastern clay is the single biggest barrier to a thriving landscape. Most local properties sit on heavy vertosols, which are notorious for waterlogging in winter and setting like concrete in summer.
Our landscape architecture and construction crew at David Claude Landscape Design tackles this exact scenario weekly. Untreated clay effectively suffocates roots and causes expensive new plantings to fail.
The true fix is comprehensive soil preparation garden melbourne properties desperately need.
A few hours of targeted work per bed dictates years of growth.
We find that proper preparation makes the difference between a struggling yard and a flourishing ecosystem. Here is the exact data-driven process to transform challenging terrain into a productive growing environment.
Our standard bed preparation
Every successful garden relies on a proven sequence of steps. Clay actually possesses a very high cation exchange capacity, meaning it holds onto essential nutrients like iron and potassium beautifully.
Our job is simply to release those trapped nutrients by fixing the physical structure of the earth. The following methodology applies to all new garden beds.
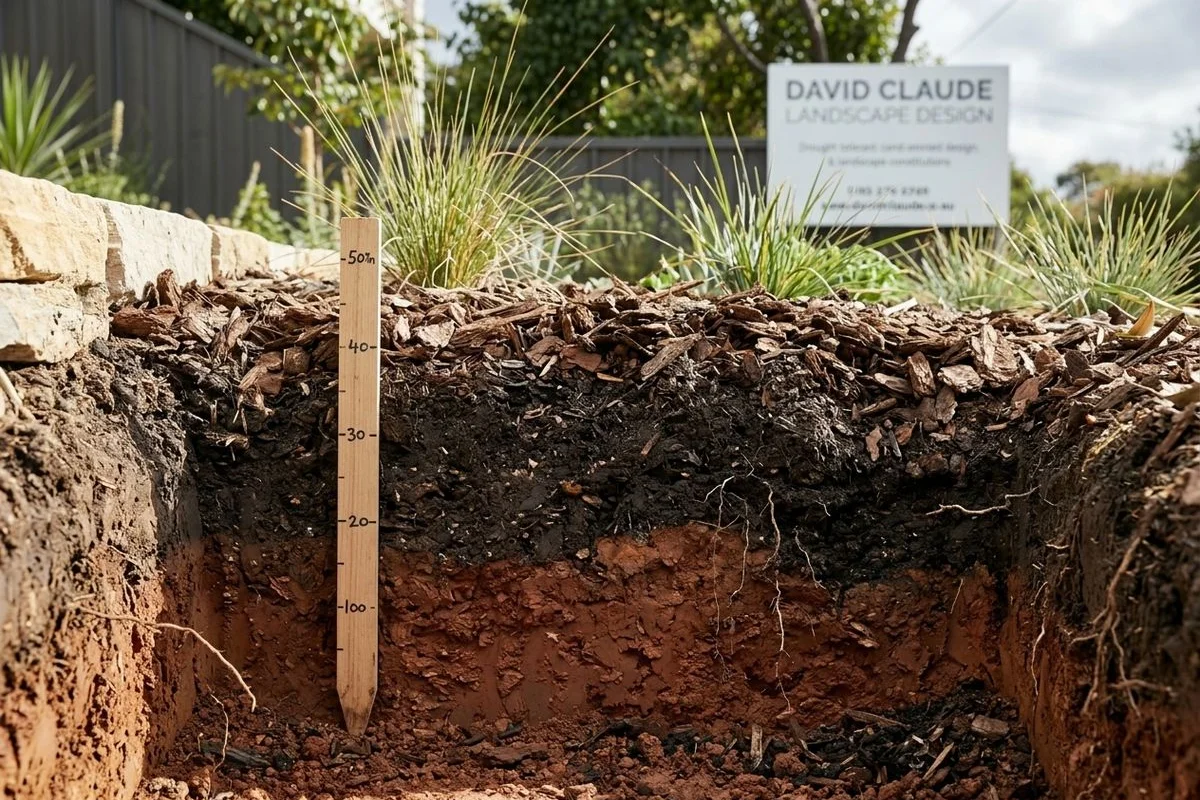
1. Decompact
Breaking up the top 300 to 400mm of soil is your crucial first step. Construction traffic and heavy footfall almost always compact bed areas around new builds.
We recommend using a rotary-hoe or a strong garden broadfork to physically fracture the earth. This deep ripping process creates the necessary channels for air and water to enter.
Many homeowners skip this step and try to place amendments directly on top of baked clay. Our experience shows that surface-level treatments fail because the roots cannot penetrate the hardpan below. This mistake wastes both time and expensive materials.
2. Amend with compost
Spread 75 to 100mm of mature composted material across the entire bed. You then need to blend this material thoroughly into the top 200mm of your freshly decompacted soil.
We target 15 to 25% organic content in the root zone for optimal plant health. Reaching this volume typically requires about 0.25 to 0.5 cubic metres of compost for a standard 10 square metre garden bed.
Adding rich organic matter like mushroom compost or a blended product like Surecrop Compost physically binds the fine clay particles together. Our team uses organic matter to create larger soil crumbs, which immediately improves aeration. This prevents the earth from compacting again after the first rain.
3. Gypsum for clay
Clay-soil beds get 1 to 2 kilograms per square metre of gypsum incorporated during the mixing phase. Gypsum (calcium sulfate) is a clay soil amendment that flocculates the microscopic particles, pulling them together to create better drainage and aeration over 6 to 12 months.
We always advise gardeners to use a kitchen scale to measure out exactly one kilogram for their first square metre. Visualizing the correct application rate prevents you from under-applying the product.
Liquid gypsum acts almost immediately, but powdered gypsum provides a much more significant and lasting structural improvement.
4. Check drainage
Fill a standard 300mm planting hole with water to test the site. If the water has not drained completely in 4 hours, the bed needs sub-surface drainage like an agricultural pipe (ag-line) before planting.
We know that no amount of soil amendment will fix a genuinely waterlogged site. Heavy vertosol clays hold onto moisture tightly, and a high water table will drown most exotic species.
Installing slotted drainage pipes at the base of the trench directs excess water away from the root zone. Our crews often pair this sub-surface drainage with raised garden mounds to give plants an extra buffer against winter flooding. Native Australian plants like Callistemon tolerate wet feet better than exotics, but good drainage remains essential.
5. Plant, water in deeply
Install all new plants at the exact same depth they sat in their original nursery container. Burying the stem too deeply invites collar rot, while planting too shallowly exposes sensitive roots to the harsh sun.
We water in every new addition deeply to settle the amended soil around the roots and eliminate damaging air pockets. Deep, infrequent watering encourages the root system to grow down into the 400mm profile you just prepared.
A light sprinkle only wets the surface and promotes shallow, weak root systems.
6. Mulch to 75mm
Apply your chosen garden mulch melbourne homeowners prefer at a 75mm depth across the entire bed. You must keep this material at least 50mm clear of all plant stems and tree trunks to prevent fungal diseases.
We consider mulch to be the final protective blanket for your newly prepared soil. Data from Greater Western Water shows that a proper layer of mulch reduces surface evaporation by up to 70 percent.
Different materials serve different landscape needs.
| Mulch Type | Expected Lifespan | Best Application |
|---|---|---|
| Sugar Cane or Pea Straw | 6 to 12 Months | Vegetable patches and young seedlings |
| Pine Bark (14mm) | 2 to 3 Years | Native gardens and windy areas |
| Crushed Gravel | Indefinite | Pathways and fire-prone zones |
Our maintenance schedule always accounts for the specific type of ground cover used.
Ongoing care
Maintaining a healthy soil structure requires a few simple seasonal tasks. The heavy lifting is done during the initial preparation, but clay always tries to revert to its natural, compacted state.
We recommend following a consistent maintenance schedule to protect your investment.
- Refresh mulch annually: Organic mulches like sugar cane break down into the soil, which feeds microorganisms but thins the protective layer over time.
- Top up compost every 2 to 3 years: Spread a fresh 25 to 50mm layer of rich organic matter directly over the existing mulch.
- Check for compaction: Inspect high-traffic bed edges regularly and use a garden fork to puncture the soil if it feels hard.
- Monitor soil moisture: Dig down 50mm during summer to check real moisture levels, as clay can look dry on the surface but remain wet underneath.
This simple routine ensures your garden thrives year after year.
We handle these steps automatically for clients who use our full garden planting service, which includes soil prep as standard. Contact our office today to schedule a site assessment and give your landscape the foundation it deserves.